Showing posts with label CSS Manassas. Show all posts

Sunday, June 4, 2017

The Manassas prepares to sail...

Earlier in the year I had acquired a 1/600 scale model of the Confederate ironclad ram Manassas from Bay Area Yard. You can read about the assembly of the model here.


View down the bow showing off the covered 32 pounder and the twin funnels. 


For painting, I went with something with a little more interest than the basic black scheme that I've used for years. This time, I'm allowing the sun and salt to do their worst and let the initial coat of black paint fade to a sun-bleached gray. Only the funnels and some of the deck fittings would retain their blacker appearance.

Manassas in profile. The gray hull contrasts with the muddy brown Mississippi and the burnt black of the funnels. 


An overhead view. Debating if the hatch covers should be painted or reflect a more subdued appearance. 


Once the gloss coat dries, I'll hit it with a Matt coat and then brush on some gloss coat to return the water to a wetter finish. Then it will be time to get this model on the table and let the Yankee's feel the wrath of this fully operational ironclad! 

Sunday, March 19, 2017

Assembling the Manassas, part 2

Completing the assembly of the Manassas. Cutting the stacks off the sprue and filing the ends flat was straightforward.


The mount for the stacks was a little more complex. The mount has a hole for each stack to sit in. It's a good design and it's spoiled by one thing. Either each hole contains a mounting post for the stack, or there was a bit of flash in each hole. Either way, the metal had to go. A Goldilocks trial and error process of sorting through the drill bits found one that fit without being too big or too small (a #44 for those wanting to know). Slowly and carefully I used the drill to bore out the offending metal.

With that resolved, a good thick, heavy duty CA adhesive was applied to the end of the stack and inserted into each hole. It was a little tricky as the hole was not a tight fit, but the stacks did stand up.

With that - assembly is completed.*

And here's the assembled model.


With the stacks installed! 

View from the forward port quarter.


Port broadside view.

Hmmm...what's the tiny guide hole? Uh oh - I've misaligned the stacks! 

Here the BAY model (on the right) next two the Thoroughbred Figures model on the left.  Two interpretations of the same model. 

From the images you should be able to see that the Thoroughbred model sits higher above the water than the BAY model. Both show many of the same types of details, though they vary slightly in terms of position. 

* I may come back and add the jackstaff for the flag later.

See how the painting went in part three! 

Thursday, March 16, 2017

Assembling the CSS Manassas - 1/600 model from Bay Area Yards

In February of 2017 I acquired a model of the Confederate ironclad CSS Manassas. Oft remembered as the Confederacy's first ironclad, she was slow and poorly armed. If it was not for the fact her opposition was entirely wooden ships, Manassas would have been found seriously wanting as a warship.

Manassas had a short, but busy career engaging Union ships at the Head of Passes, making the journey north to briefly join the River Defense Fleet near Memphis before returning to New Orleans and participating in her final battle against the Union navy at Fort Jackson as Farragut ran the guns.

This project is a 1/600 scale model of Manassas from Bay Area Yards. (Kit # HCS-024). As 1/600 models go, this one is straightforward with a minimal number of of parts. One (1) hull casting and one (1) sprue of stacks and fittings.

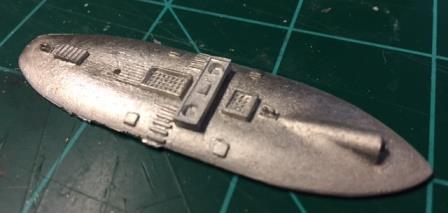
Manassas straight out of the bag. 

The historical record concerning Mansassas is conflicted with some sources indicating that the ship had one or two smokestacks. Some theories hold it was two stacks, then one following a refit after the engagement at the Head of Passes. The model offers the option to build either of the stack variants. As I already have a Manassas with one stack, I elected to model this kit as the early two-stack version suitable for the Head of Passes battle.

The hull casting needed a little clean up around the edges. Most of the work is for the sprue casting at the aft end of the model with required a bit of cutting. After that it was very minor filing to smooth the edges and make the bottom of the casting flush.

A little scraping along the starboard waterline is causing the hull to look odd. 


Sprue with flash.

Sprue with flash removed from the short midships steam pipe. 

Basic assembly is easy. I based the hull of the model on a thin piece of styrene. As usual, I used Woodland Scenics Flexpaste as the adhesive to attach the model.


The hull with the base for the two smokestacks installed.

And an overhead view.

With the hull attached to the base with the Flexpaste. The midships steam pipe is installed. 
Starboard quarter view of the model.


Next steps are to install the stacks and get a coat of primer on the model!

Assembly continues on part 2.